Whilst the period charm of an older house is undeniable, there are some features which cause problems for homeowners down the line. From cracks and bulging in a lath and plaster ceiling to the dreaded artex and woodchip, there’s a whole world of problems lurking above you.
Lath and Plaster ceiling disaster
‘Laths’ are thin strips of wood (about 25mm wide) nailed to the underside of the ceiling joists with a gap of about 5mm between each lath. Plaster was then applied to the underside of the laths, held in place by being forced through the gaps and hooking over the tops of the laths (nibs) where it sets. Multiple layers of plaster are smoothed over the lath to form a flat ceiling surface.
Over time, hard, brittle plaster can react to vibration or water exposure and may crack if enough of the nibs snap off. If the weight of the plaster cannot be supported by the remaining nibs, the ceiling starts to collapse. Woodchip wallpaper, a cheap strong paper with small chips of wood within it to give the effect of a textured finish, was very popular in the 1970’s and an ideal choice for hiding cracked walls and ceilings.
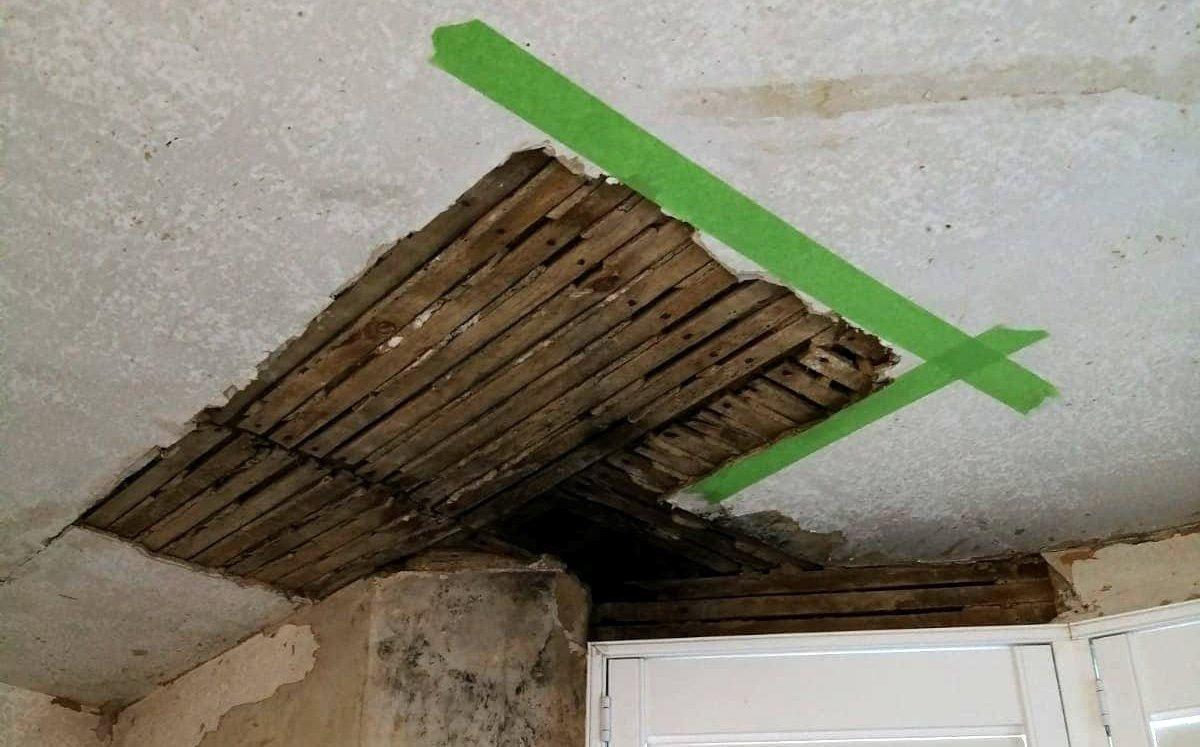
This 1930’s house still has a few rooms with the offending woodchip. The owners wanted to get rid of the woodchip in the dining room but as the woodchip came off the cracks began to show. The dining room bay window lath and plaster ceiling revealed its history of water damage.
Repair steps
- With protective sheets laid to protect flooring, start by removing the loose plaster (see first image).
- Tip: cut ceiling edges straight and square to make the plasterboard a little easier to place.
- Measure the hole in ceiling and cut the plasterboard to the measurements. The plasterboard and original plaster need a 5mm gap between them to withstand general house movement, reduce the chance of cracking and prevent the plaster blowing.
- With plasterboards cut and ready to fit using drywall screws, screw the plaster boards in to place. Make sure the screw heads are below the surface of the plaster board to prevent screw pops and visible screw heads on the finish.
- There should be no movement in the plasterboards when screwed down and ideally the screws want to be in to the joists in order to hold the plasterboard. In this case however, there was no access to the joists and the lath was strong enough to hold the small pieces of plasterboard in place, so the plasterboard had to be fitted to the lath.
- Use bonding coat to fill in the gaps between the plasterboard and original plaster. With this project the plasterboard ended up being thicker than the original plaster so the Bonding coat also helped to feather off the plasterboard with the rest of the ceiling, removing any ridges.
- Apply scrim tape to all the joints (internal corners, joints between the boards and even on top of bonding coat where the joint between the plasterboard and original plaster are). You would apply the tape so that one strip of tape follows a crack or joint while fully covering them. Scrim tape will help prevent the filler cracking with normal house movement.
- Mix up your Easifill. Ideally you should use a 6 inch jointing knife to apply the Easifill while your other taping knife or hawk is holding the filler. Apply the Easifill to the scrim tape and screw heads, making sure the filler is smoothed off with the ceiling, as applying it too thick and sanding it all down can be a headache. Repeat this process another two times, ideally it will need 3 coats of filler to get the desired smooth finish.
- Wearing a mask, use 120G – 180G sandpaper to lightly sand the filler, making sure not sand too much as this lose the smoothness and may expose scrim tape causing an unwanted bubble effect.
- With this dining room ceiling I also applied Wallrock lining paper to 1) strengthen the ceiling 2) create an even smoother finish and 3) eliminate the chance of old wallpaper paste contaminating the ceiling paint.